Pages

Monday, July 20, 2015

Flower Stickers

See this look on Instagram
How to achieve this look:

1. Start by applying your base coat, I used Essie 3-way glaze.

2. Apply one coat of your base color and let dry. I used China Glaze 'Boho Blue'.

3. With a striper brush add grass with a bright green polish.

4. Allow to dry then add your sticker decals.

5. With a small brush and acetone clean around your cuticles. I use the Kolinksy French Nail Brush #12.

6. Apply a top coat, I used Essie Good to Go.


See this look on Instagram


Follow me on Instagram @MoManisMoProblems

**Disclosure- I received the flower nail stickers (item number 20692)
to review from TheBornPrettyStore as part of their blogger program.
For a 10% discount on their website use code MOW10.**

Red Ribbon

See this look on Instagram & Preen.me
How to achieve this look:

1. Start by applying your base coat, I used two thin coats NYC peel off base, followed by a coat of Essie 3-way glaze.

2. Apply one coat of your base color to each nail and let dry. I used Island Girl "Royal Hawaiian" on my ring finger and pinky, and Color Club "Sugarplum Fairy" on my pointer and middle fingers.

3. Before stamping I like to apply liquid latex or tape around my cuticle for easy clean up.

4. Choose one or more stamping images from desired stamping plate and apply to nail. For this mani I chose the Born Pretty image plate BP26 and used four different images. This image plate was really easy to use, it is engraved well and the image picked up easily.

5. Remove the latex or tape with tweezers, and with a small brush and acetone clean around your cuticles. I use the Kolinksy French Nail Brush #12.

6. Apply a top coat, I used Essie Good to Go.


Born Pretty image plate BP26


Follow me on Instagram @MoManisMoProblems

**Disclosure- I received image stamping plate BP26 (item number 17909)
to review from TheBornPrettyStore as part of their blogger program.
For a 10% discount on their website use code MOW10.**

Smokey Mani

See this look on Instagram

A group of us got together to do a tribute to our friend Carmen @ineedamani on IG. We all chose one of her manis to recreate then made a collage for her. I changed mine up a little from the original and started with a pink base, but I really liked the way these turned out!


See @ineedamani's original on Instagram

How to achieve this look:

1. Start by applying your base coat, I used Essie 3-way glaze.

2. Apply one coat of your base color and let dry. I used Shinespark "Pumped Pink".

3. Apply liquid latex or tape around your cuticle for easy clean up.

4. Choose a stamping image and apply to nail.

5. Remove the latex or tape with tweezers.

6. Apply a top coat, I used Essie Good to Go.

7. To get the smokey effect top with Sally Hansen's Big Smokey top coat or other sheer black polish.

8. With a small brush and acetone clean around your cuticles. I use the Kolinksy French Nail Brush.

See this look on Instagram

See this on Instagram


Follow me on Instagram @MoManisMoProblems

** Nothing to disclose. This mani was done with products I purchased.**

Stamped Color Club Holo

See this look on Instagram
How to achieve this look:

1. Start by applying your base coat, I used Essie 3-way glaze.

2. Apply one coat of your base color to each nail and let dry. I used Color Club "Cloud Nine" on my ring finger and pinky, and Fresh Paint "Glasstonberry" on my pointer and middle fingers.

3. Before stamping I like to apply liquid latex or tape around my cuticle for easy clean up.

4. Choose an image and apply to nail.

5. Remove the latex or tape with tweezers, and with a small brush and acetone clean around your cuticles. I use the Kolinksy French Nail Brush #12.

6. Apply a top coat, I used Essie Good to Go.

See this look on Instagram

Follow me on Instagram @MoManisMoProblems

** Nothing to disclose. This mani was done with products I purchased.**

Monday, July 6, 2015

Rhinestones from The Born Pretty Store

See this look on Instagram & Preen.me

How to achieve this look:

1. Start by applying your base coat, I used two thin coats NYC peel off base, followed by a coat of Essie 3-way glaze.

2. Apply 2-3 coats of glitter polish to your pointer and pinky, let dry. I used Color Club The Uptown (original formula).

3. Apply 2-3 coats of creme polish to half of your middle and ring fingers, allow them to dry. I used Color Club Blue Ming and Hydrangea Kiss. On my thumb I used Blue Ming.

4. Down the center of the nails with split colors add your gems one by one with a dot of top coat.

5. With a small brush and acetone clean around your cuticles. I use the Kolinksy French Nail Brush #12.

6. Apply a top coat, I used Essie Good to Go. On the nails with the gems I applied the top coat against the sides of the gems but not over them.

See this look on Instagram


Follow me on Instagram @MoManisMoProblems

**Disclosure- I received the rhinestones (item number 16674) to review from The Born Pretty Store as part of their blogger program. For a 10% discount on their website use code MOW10.**

Thursday, July 2, 2015

Remembering Rowan Nails

See this on Instagram

This mani was done as part of a collaboration for a friend that lost her daughter (Rowan) at birth a year ago. You can view all the beautiful nails done for her at #RememberRowan on Instagram. It was great being part of the collaboration and I hope it helped Rowan's mom through some of her grief.


Flipagram video of all the manis done for Rowan


How to achieve this look:

1. Start by applying your base coat, I used Essie All in One.

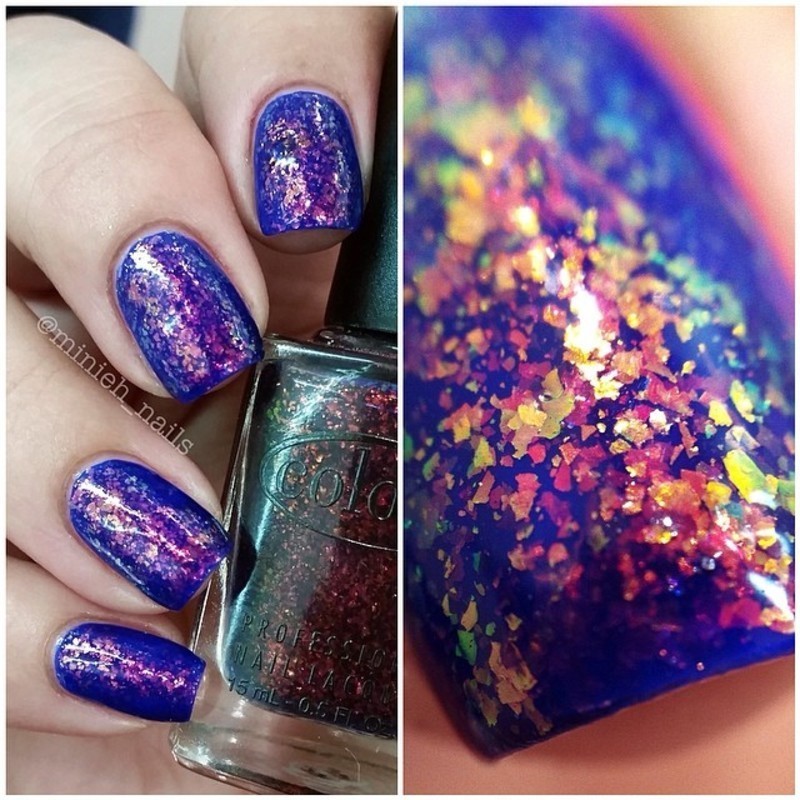
2. Apply 2-3 layers of your base color, I used Sinful Colors Tempest.

3. Apply liquid latex or tape around your cuticle for easy clean up.

4. In a cup of room temperature water, drop s few drops of a nail polish into your water. I used Sally Hansen Babe Blue.

5. Sprits the spread polish with hairspray to create design.

6. When you're happy with your design, lineup your nails and dip in.

7. Using a cotton swab clean the surface of the water, once the water is clean, slowly remove your fingers.

8. Repeat steps 4-7 with another polish of your choice, I used Sally Hansen Celeb City.

9. For my ring finger I stamped butterflies with a Vivid Lacquer plate VL024 and an M Polish stamping polish.

10. Remove the latex or tape with tweezers, and with a small brush and acetone clean around your cuticles. I use the Kolinksy French Nail Brush #12.

11. When you're finished apply a top coat, I used NYC Grand Central Station.


The Vivid Lacquer plate I used for this mani is not a plate I would recommend. It is not an easy plate to work with as the images are not engraved deeply enough to pick them up easily. This is just my personal opinion about this plate and I'm only stating it so it may help others find high quality products.


Follow me on Instagram @MoManisMoProblems


**Nothing to disclose.**